Sunday, August 28, 2016

Operation Christmas Child Boxes - Girls 10-14


I did Operation Christmas Child for the first time last year and loved it! I don’t have kids to buy Christmas presents for and enjoy the fact that I get to buy fun things for kids in need.

This year I put together boxes for girls ages 10-14. I chose the older age group because I heard that they get the least amount of boxes. I might have gone a bit overboard because the boxes barely close! But I am excited to bless a few girls this Christmas.

I chose to go with plastic shoe boxes because they can be used long after “opened” and I wanted to be as practical as possible. However, on the flip side, I have heard that sticking to the shoe boxes provided by OCC is most efficient as it allows the most boxes to be packed and shipped, so there are pluses and minuses to deviating from that.

Here is a picture of everything I included in my box:


It all fits!!!


I got nearly everything from the Dollar Store, a few things from Walmart or Target.  I shopped periodically throughout the year so it never felt like much, just a few items here or there.

Hygiene Items:
Homemade terrycloth bag to hold everything in (can double as a washcloth)
Soap (I specifically got Ivory since it floats, remember to put it in a ziplock bag so the smell doesn’t affect everything else in the box)
Soap holder (this is important since they likely don’t have a place to keep the soap when not in use)
Toothbrush/ holder
Toothpaste
Deodorant
Comb
Hairbrush
Dehydrated towel (“Finding Dory” cute and tiny)
Q-Tips in a “Frozen” tin that they can re-use
Shower puff 
"Barbie" Band-Aids

School/ Craft Supplies:
Pencil case (I got a few little bags to put things in since they can be useful for other things as well)
Pencils
Erasers
Colored pencils
Black pens
Colored pens
Highlighters
Pencil sharpener
Safety scissors
Glue stick
Paper clips
Calculator
Stencils
Rubber bands
Drawing paper
Journal
Coloring book
Post-its 
"Finding Dory" stickers


Practical Items:
Sewing Kit
Water bottle filled with hard candy
3 pairs of underwear
2 pairs of socks 
Bag for underwear and socks (just because, why not throw in another bag)
Flip Flops 
Plastic spoon and fork
Large drawstring bag


Toys/ Games:
Cheerleader type pom-poms
Jump Rope
“Disney Princess” Puzzle
Checkers game
Card games  (Old Maid, Go Fish, etc)
Punch balloons
Yo-yo
Silly Putty (I put this in a Ziploc so it doesn’t dry out if the “egg” breaks)
Generic “Barbie” doll

Pretty stuff:
Bracelets 
Paracord bracelet
Barrettes
Hair ties
Headbands
Chap stick
Compact mirror
Manicure kit 
A bag to put it all in

Anyway, if you are putting together boxes of your own, I hope this has given you  some ideas. Happy packing!

Sunday, July 5, 2015

Orange Creamsicle Wedding Cake

My friends, Jayson and Nattida, got married last weekend. I was asked to do the cake which I was so excited to do because Nattida is a "foodie" and always gives me a challenge in the kitchen. This was no exception. She asked for a cake that tasted like an Orange Creamsicle ice cream bar. Hmmm... that one was new to me! And honestly... didn't sound all that delicious (I am a chocolate girl!). But she is the bride and her wish is my command! I started by Googling "orange cake" and surprisingly enough I found quite a few recipes. I tried a few but they didn't pass the taste test until I came upon the Pioneer Woman's Orange Cake recipe. I should have known, I can pretty much trust anything the Pioneer Woman says is good. Seriously, that woman is a culinary genius!

I made a few minor changes and added an "Earl Grey Frosting" which was another unique request from the bride. The Earl Grey flavor complimented the orange quite nicely and the cake followed a delicious dinner of Thai food. It ended up being a great recipe for a wedding cake because it was a very dense pound cake and sliced very cleanly. The best part about it was that it was so unique, the wedding guests will definitely remember an Orange Creamsicle cake!


Orange Creamsicle Cake with Earl Grey Frosting

Cake:
3 sticks butter, softened
3 cups sugar
5 whole eggs
3 cups flour
1/2 tsp. salt
1 cup + 1 Tbs. orange soda
2 drops orange food coloring
1 Tbs. orange zest
1 tsp. orange extract

Frosting:
2 sticks butter, softened
5 cups powdered sugar
1 tsp. vanilla
1 cup of milk steeped with 1 tsp. of earl grey tea

Cake:

Preheat oven to 325 degrees.

In the bowl of an electric mixer fitted with the paddle attachment, cream together butter and sugar. Add eggs one at a time, mixing after each addition. Combine flour and salt, then add it 1 cup at a time, mixing after each addition. With the mixer on low, slowly add 1 cup plus 2 tablespoons orange pop until combined. Add orange food coloring, orange extract and orange zest.

Thoroughly spray a pan with nonstick baking spray. Add large spoonful’s of batter until the pan is filled, then even out the surface. Bake for 1 hour, or until a toothpick comes out clean. Remove the pan from the oven and let it sit in the pan for 5 minutes. Carefully turn it out onto a cooling rack and let it cool.


Frosting:

Heat the milk called for until very hot but not boiling.

Place the tea leave in the milk and steep until very strong. You’ll know the milk is ready to be used when it turns a deep caramel color. Place in the refrigerator and chill overnight. When ready to use, strain the milk through a coffee filter to remove the tealeaves.

Mix the butter until creamy and smoothed out. Add 1 cup of the powdered sugar and mix until creamy. Add the remaining sugar and mix until creamy.  Add the vanilla and the tea infused milk. You will not use the entire cup; just pour into the frosting until it is the right consistency. Mix until creamy. 

The finished cake. My friend, Diamant, did the flowers. She is so talented!
 

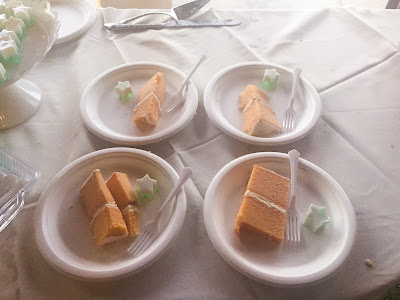
This is what it looked like plated (isn't it pretty?). The cake was served with a Thai coconut jelly type of dessert. 


There were four pieces left after everyone was served. Phew! I was getting a tiny bit worried toward the end but it ended up being perfect! 


Sunday, October 5, 2014

It's October, time for pumpkin stuff!

It's October! We are moving into my favorite time of year. As long as we an get through the random bursts of heat, Santa Ana winds, and fires, we will be good to go! It is supposed to cool down a bit tomorrow so I am crossing my fingers. 
So, even though it doesn't really feel like fall here in Southern California, I am inspired to bust out the pumpkin recipes. I love pumpkin and chocolate together so I found a great recipe for Pumpkin Chocolate Chip Bars. I have a great Pumpkin Swirl Brownie Recipe that I like, but I thought I would try a new one, and I think I like these even better! 


Pumpkin Chocolate Chip Bars


Ingredients:

1/2 cup unsalted butter (1 stick), melted
1 large egg
3/4 cup pumpkin puree (not pumpkin pie filling)
1 cup light brown sugar, packed
1 tablespoon vanilla extract
2 teaspoons pumpkin pie spice
1 teaspoon cinnamon
1 1/4 cups all-purpose flour
1 1/4 cups semi-sweet chocolate chips + 2 tablespoons, for sprinkling


Directions:
Preheat oven to 350 F. Line an 8-by-8-inch baking pan with aluminum foil, spray with cooking spray; set aside.
In a large, microwave-safe bowl melt the butter, about 1 minute on high power.
Wait momentarily before adding the egg so you don't scramble it. Add the egg, pumpkin, brown sugar, vanilla, pumpkin pie spice, cinnamon, and whisk until smooth.
Add the flour and stir until just combined, don't overmix.
Stir in 1 1/4 cups chocolate chips.
Turn batter out into prepared pan, smoothing the top lightly with a spatula.
Evenly sprinkle with 2 tablespoons chocolate chips, smoothly the top lightly with a spatula.
Bake for about 32 to 33 minutes, or until done. A toothpick inserted in the center should come out clean, or with a few moist crumbs, but no batter. The moisture content in pumpkin varies, as do climates and ovens; bake until yours are done. Allow bars to cool in pan for at least 30 minutes before slicing and serving. I find the bars taste better on the second and third day after the flavors have married. Bars continue to get softer and moister for about 3 days after baking. Bars will keep airtight at room temperature for up to 1 week, or in the freezer for up to 6 months.

* Disclaimer, this is not my photo, i got it from the original recipe I found on Pinterest: here

Friday, September 26, 2014

Tres Leches Cake


Well, it is fall again which means that Community Groups are in full swing. I love getting back into regular time spent with friends. Summer is a nice break but after a couple of months I miss the time we get to spend together each week. Anyway, so we are back - yay! That also means that my side job of baking birthday treats is back! Birthdays, birthdays, birthdays! There are 1-2 a week for the next month! It is a good thing I enjoy baking so much!

This week was Tyler’s birthday and being a man of habit he requested French Silk Pie. I think this is the 5th row running. I can’t blame him though; it is a pretty decent request. After making his boys a Lightning McQueen cake for their birthday, he requested that his French Silk Pie be shaped like the Sears tower. I was going to try to attempt something just to be funny, but you can’t really “shape” French Silk. (So, Tyler, you will take your round, normal shaped pie and be happy about it!)

Jaime’s birthday was also this week and he requested a Tres Leches cake. I LOVE when people ask me to make something I haven’t ever done before. I Googled recipes and found a great one on the Food Network that had rave reviews. I decided to go with that one and it turned out delicious! If you have never had Tres Leches before, it actually means “three milks cake”. It is a spongy yellow cake with three types of milk combined and poured over top of it. I was a little nervous pouring 4 cups of liquid over a baked cake but it actually absorbed all of it overnight and the result was a cake that has the buttery flavor of shortbread but the texture of a dense, moist, cake. Mmmm, mmmm good!

This particular recipe called for it to be topped with sliced mango but that doesn’t seem to be consistent with most of the recipes I found. I do like that addition though, I felt like the like, tangy fruit complimented the rich, sweet cake well. This recipe is definitely a winner and I anticipate it making it into the regular dessert rotation.

Tres Leches Cake

Ingredients:

Cake:
6 eggs, separated
2 cups sugar
2 cups flour
2 tsp. baking powder
1/2 cup whole milk
1 tsp. vanilla

Cream topping:
1 14 oz. can evaporated milk
1 14 oz. can sweetened condensed milk
1 cup heavy cream

Frosting:
3 Tbs. water
3/4 cup sugar
3 egg whites

*optional - 2 ripe mangoes, peeled and thinly sliced


Directions:

Cake:
Preheat the oven to 350 degrees F. Lightly grease and flour a 9” x 13” baking dish and set aside.

In the bowl of a mixer, beat the egg whites on low speed until soft peaks form. Add the sugar gradually with the mixer running and peak to stiff peaks. Add the egg yolks 1 at a time, beating well after the addition of each.

Sift together the flour and baking powder and add to the egg mixture, alternating with the milk. (Do this quickly so the batter does not lose volume.) Add the vanilla. Bake until golden, 25 - 30 minutes.

Cream topping:
In a blender, combine the evaporated milk, condensed milk, and heavy cream and blend on high speed.

Remove the cake from the oven and while still warm, poke holes throughout the cake with a fork so the cream can absorb evenly throughout the cake. Pour the cream mixture over it. Let sit and cool to room temperature. Cover and refrigerate until well chilled, at least 4 hours or overnight.

Frosting: 

Once the cake is completely chilled, in a saucepan combine the water and sugar. Bring to a boil. Reduce the heat and stir to dissolve the sugar. Cook until the mixture reaches the soft ball stage, 235 to 240 degrees F. Remove from the heat. In a medium bowl, beat the egg whites to soft peaks. While beating, add the hot syrup in a stream. Beat until all the syrup has been added, the mixture cools, and a glossy icing forms. Remove the cake from the refrigerator and spread the icing evenly across the top.

*Optional: top with sliced mangoes


*Disclaimer, this is not my picture. I forgot to snap one so this is a random pic from the internet, but my dessert looked like this :)

Saturday, August 23, 2014

Lightning McQueen

Today we celebrated the birthdays of my friends, Tyler and Trisha's sons. One turned 3 and the other turned 4. This is the perfect opportunity to try my hand at a more creative cake than the typical ones I make for adults. 
A few years ago, I interned with a woman who made these kinds of cakes and picked up a lot of great tips, but I will say, doing the whole thing by myself was harder than it looked!
The boys like the movie "Cars" so I decided to make a cake that looked like Lightning McQueen. I found a tutorial on Pinterest and followed the directions to a tee. The first step was making all of the car details. They were made a few days ahead of time so they could harden up. With fondant, sometimes you want it to be soft and mailable but other times it needs to be hard in order to keep it's shape. Here I have the front of the tires, the "Rusteze" logo, the eyes, the windows, the headlights, and the back piece of the car.


Once all the details were done, it was time to make the cake. I made my normal chocolate cake recipe and stacked it three layers high with frosting in between each layer.  There was a lot of frosting and the end result was a very moist, frosting-rich cake! I carved the cake into a car shape and then after frosting it, I covered the whole thing with fondant and then added the details. 
The hardest part was actually covering the cake in fondant. I ended up rolling it out a bit too thin so Lightning McQueen kind of look like he had been around the track a bit. His finish looked a bit pitted and his tires looked a bit worn. But he looked perfect to the eyes of 3 and 4 year old boys. 
As you can see, it was a hit!
More of my friends need to have kids so I can make more 3-D cakes. They are fun!

Tuesday, July 22, 2014

Rainbow colors!

For my birthday my friend, Cheryl, bought me some fun kitchen gadgets. The kind that are random enough that I don't already have them. In case you don't know me, that is an awesome present idea! Among the many treasures, she gave me a small set of cake pans that are perfect for making a rainbow cake. I have wanted to try a rainbow cake for a while and my friends son turned 4 a few weeks ago so it was the perfect opportunity! I made my vanilla cake which is super versatile Recipe Here and just split it into six 1-cup portions. Then I just added food coloring. It was very simple. I think another fun idea is to do various shades of the same color, like dark pink fading into light pink. Anyway, the rainbow cake turned out super cute and is perfect for a child's birthday.


Thursday, June 26, 2014

Tea Cookies

Over the last couple of weeks I have made two new cookie recipes. They are light, summery cookies that go great with afternoon tea. It is really too bad I am not British, I think I would enjoy taking a mid-afternoon break to sip tea and have a cookie. The last few hours at work would be much more enjoyable after a cookie. Anyway, These ones are pretty good. Raspberry Almond Shortbread Cookies and Lemon Tea Cookies. I can't decide which is my favorite because they were both winners!

Raspberry Almond Cookies

Cookies:
1 cup butter, softened
2/3 cup sugar
1/2 tsp. almond extract
2 cups flour
1/2 cup seedless raspberry jam
sugar for sprinkling

Glaze:
1 cup powdered sugar
4 tsp. milk
1 tsp. almond extract

Cookies:
In a medium bowl, beat butter at medium speed. Add the sugar and almond extract. Mix until well combined. Mix in flour. Cover and chill for one hour or until dough is easy to handle.
Preheat the oven to 350 degrees. Shape into 1 inch balls, place 2 inches apart on a cookie sheets. Using your thumb, press an indentation in the middle of each ball. Spoon about 1 tsp. jam into the indentation and then sprinkle with sugar. Bake for about 10 minutes or until edges are light brown. Cool on cookie sheets for one minute. Transfer cookies to wire racks to finish cooling.

Glaze:
For icing, in a medium bowl, combine powdered sugar, milk and almond extract. Drizzle cookies with icing.


Lemon Tea Cookies

Cookies:
3/4 cup butter
1 tsp. lemon zest
1 Tbs. lemon juice
1 1/4 cup flour
1/2 cup cornstarch
1/3 cup powdered sugar

Frosting:
3/4 cup powdered sugar
1/4 cup cold butter sliced into small cubes
1 tsp. lemon zest
1 tsp. lemon juice

Cookies:
Cream butter, lemon zest and juice until light and fluffy. In a separate bowl, sift dry ingredients and mix into butter on low speed. 
Divide in half. Shape each half into a 8x1 inch log and roll in plastic wrap. Refrigerate for 2 hours. Cut into 1/4 inch rounds. Bake at 350 for 12 minutes. Cool and frost. 

Frosting:
On low speed, mix cold butter with electric mixer until smooth. Slowly add powdered sugar until blended. Beat lemon zest and juice. 


Disclaimer: there are not my pictures, I was too lazy to take my own. 

Monday, June 9, 2014

Variations of Vanilla

Yesterday my friends, Ryan and Sasha, got married. It was a beautiful wedding. It is so exciting to celebrate the joining of two people who are absolutely perfect for each other. sigh... Anyway, it was the third wedding where I have done the cake/dessert. I made vanilla bean cupcakes filled with chocolate hazelnut cream. (recipe here) They turned out very cute. I sprayed half of them with a pearl sheen which made them sparkle and the other half I sprinkled with edible pearls. The overall effect was very "wedding-y"

I really love this vanilla cake recipe. It is so versatile! It is actually my red velvet cake recipe with vanilla bean paste instead of red food coloring and chocolate. I used the recipe to make funfetti cupcakes for my co-workers birthday last week. I don't know if the sprinkles give it a different taste of if it is just the fact that funfetti is so festive but I loved these cupcakes. They tasted delicious and were perfect for a birthday. I know I have the vanilla cake recipe in multiple places but I will put the actually funfetti recipe here for easy reference.

Funfetti Cupcakes

Cake:
2 cups sugar
2 sticks butter, at room temperature
2 eggs
2 1/2 cups cake flour
1 tsp. salt
1 cup buttermilk (or 1 cup milk w/ 1 Tbs. vinegar)
1 tsp. vanilla
1/2 tsp. baking soda
1 tsp. vinegar
1 cup multi-colored sprinkles

Frosting:
8 oz. cream cheese
1 stick butter, softened
1 cup marshmallow cream
1 lb. powdered sugar
multi-colored sprinkles for decoration

Preheat oven to 350 degrees. In a mixing bowl, cream the sugar and butter, beat until light and fluffy. Add the eggs one at a time and mix well after each addition. Sift together flower and salt. Add flour mixture to a creamed mixture alternately with buttermilk. Blend in vanilla. In a small bowl, combine baking soda and vinegar and add to mixture. Stir in the multi-colored sprinkles.

Pour batter into cupcake tins. Bake for 20 minutes (rotating the pans halfway through). Remove from heat and cool completely before frosting. Blend cream cheese and butter together in a mixing bowl. Add marshmallow cream and sugar and blend. Color with food coloring if desired. 


Monday, March 3, 2014

Chasing Winter - Days 10 & 11 (The South Coast and Blue Lagoon)

Day 10
Today we toured the South Coast of Iceland. It was amazing! I think Iceland has to be the most interesting country I’ve ever been to in terms of the landscape. We saw volcanoes, lava rocks, glaciers, waterfalls, sea stacks, and black sand beaches all in a day. Not only that but the weather is crazy! The first couple of days here have been so nice. Cold, but sunny and clear so not too bad at all. Silly me left my waterproof pants at the hotel because I really didn’t need them yesterday and it was kind of annoying to wear so many layers, so I decided to just stick with my jeans. Well, today, I needed them! It went from sunny and clear to unbelievably windy and sleeting sideways. We were walking to a glacier and I got soaked in about 5 minutes. Literally 10 minutes later the sun was out and it was great again. Crazy!
Here is a picture of the glacier! Isn’t it amazing? Some people went on a hike on the glacier but we went to the beach instead. Notice the beautiful blue skies. This was about 15 minutes after the wind/sleet storm!
I am so glad we went to the beach… it was not your normal beach. First of all it was black sand and pebbles. All of the beaches in Iceland are black sand beaches because of the volcanoes. I brought a bag of black beach pebbles back for vase filler or something. Forget little trinkets, this will be my Iceland souvenir! And then there were the sea stacks. We saw those in La Push and again here. I LOVE sea stacks, they are so cool. They make San Diego beaches seem so boring.
Oh, and look at this crazy cliff! It reminds me of the Rock Biter from The Never-ending Story. It was so amazing looking. You can’t tell from these pics but the wind here was crazy. It even pushed my mom over when we were walking!

We drove to tons of waterfalls. Iceland has hundreds of them! The road on the way was curvy even though it could have been straight because Icelanders believe in elves (really).  So much so that they will build a road around what they believe to be an elf home so that they don’t disturb, consequently Iceland’s roads don’t always make much sense. I couldn’t grab a picture of this because we were driving but in the middle of nowhere there were tiny little doors on big rocks. These were the elf homes.
Here are a few more pics of one of the waterfalls we went to. LOVE the rainbow! It was so beautiful!
After our tour we went out for a fancy lobster dinner. It is a good thing that the only food we had to buy in Iceland was our dinners because food in Iceland was EXPENSIVE! So we just decided to go for it and eat like queens. It was delicious!
We tried to see the Northern lights again tonight but they still didn’t show. I am very sad as I was dying to see them but oh well, you can’t control Mother Nature. I will just have to come back I guess!

Day 11
Today was our last day in Iceland. We went to the Blue Lagoon. It was so perfect!!! For the last two weeks we have been waking up early and going to bed late and walking on average 10 miles a day so soaking in hot geothermal baths before boarding our flight was the perfect ending to our trip. We floated around for hours letting the silica waters soothe our skin. We got algae masks and silica mud masks. Our skin feels amazing. I would love to go back just to soak in the Blue Lagoon some more.
 
We are now back in Seattle and tomorrow morning mom will fly back to Idaho and I to San Diego. It has been a great trip! It was really great spending time with my mom. Now that I know she is so adventurous I will have to suggest more trips! Alaska maybe? The Northern Lights are still pretty high on the bucket list so I see more trips to the great white north in my future.

In spite of the fact that we missed the lights, I would say we had a great trip! We packed a ton into the last couple of weeks and I feel satisfied with my vacation. I feel ready to go home. Fortunately I had the foresight to take a couple of extra days to recover before going back to work. I don’t have to jump back into the daily grind until Friday! The best part of vacation? Going back home, curling up in my own cozy bed and sleeping in, then lounging around in my P.J.’s all day and binge watching Downton Abbey for two days. After all of these adventures, I am exhausted! Good night world and thanks for tuning in…