Tuesday, May 31, 2011

Bon Fire: Martha Stewart Style!

Tonight my Tuesday community group is having a BBQ/Bon Fire to wrap up the year. It feel like it is the official start of Summer! Bon Fires and BBQ's are some of my favorite things about Summer.  Especially on the beach. If I can't be camping in my beloved Rocky Mountains, at least I have the ocean, and a fire on the beach is just as good as one in the mountains. I am bringing s'mores tonight and I decided to get all domestic (like that never happens) and make homemade s'mores stuff. I made graham crackers and marshmallows and they turned out great! Also, much easier than expected. I actually made them before church on Sunday, (being productive is one of the silver linings to waking up at 6:00 a.m. on my days off!)

I'll start with the graham crackers. Here is the recipe:

Graham Crackers
2 cups whole wheat flour
1 cup flour
1 tsp. baking powder
½ tsp. baking soda
½ cup butter, softened
½ cup brown sugar
⅓ cup honey
1 tsp. vanilla
½ cup milk

Sift together the whole wheat flour, all-purpose flour, baking powder and baking soda; set aside.
In a medium bowl, cream together the butter, brown sugar and honey until light and fluffy. Stir in the sifted ingredients alternating with the milk and vanilla. Cover dough and refrigerate for at least 2 hours.
Preheat the oven to 350°F. Divide the chilled dough in half. On a well floured surface, roll each half of the dough out until about ⅛ inch thick. Cut dough into 4" squares by using a pizza cutter. Place squares onto ungreased cookie sheets. Use a toothpick to make several small holes in each cracker. For a cinnamon flavored crackers, sprinkle with a cinnamon sugar mixture before baking.


Bake for 13 to 15 minutes in the preheated oven. Remove from baking sheets to cool on wire racks. Makes about 30-32 4" graham cracker squares (15-16 s'mores)


I had the bright idea of covering the bottoms of each cracker in melted chocolate so that they were already "s'more ready". I generally find a Hershey's candy bar to be too thick for a good s'more, it's hard to get it all nice and melty. Anyway, we will see how this works.


Now, here are the marshmallows:

Homemade Marshmallows
shortening to grease pan
1 cup cold water, divided
3 envelopes unflavored gelatin
2 cups sugar
2/3 cup light corn syrup
1/4 tsp. salt
1 tsp. vanilla
1/4 cup cornstarch
1/2 cup powdered sugar

Prepare pan: Coat a 9“x9” baking pan with shortening. Mix the cornstarch and powdered sugar and coat the greased pan thoroughly. Set aside starch/sugar mixture for later use.
Pour 1/2 cup cold water into bowl of heavy-duty mixer fitted with whisk attachment. Sprinkle gelatin over water. Let stand until gelatin softens and absorbs water, about 15 minutes.
Combine sugar, corn syrup, salt, and remaining 1/2 cup cold water in heavy medium saucepan. Stir over medium-low heat until sugar dissolves. Attach candy thermometer to side of pan. Increase heat and bring syrup to boil. Boil, without stirring, until syrup reaches 240°F, about 8 minutes.


With mixer running at low speed, slowly pour hot syrup into gelatin mixture in thin stream down side of bowl. Gradually increase speed to high and beat until mixture is very thick and stiff, about 15 minutes. Add vanilla and beat to blend, about 30 seconds longer.
Starts off like this:

and turns into this:

Scrape marshmallow mixture into prepared pan. Smooth top with wet spatula. Coat with more starch/sugar mixture. Let stand uncovered at room temperature until firm, about 4 hours.


Loosen marshmallow from the sides and bottom of the pan with a spatula. Turn marshmallow slab out onto a cutting board dusted with starch/sugar mixture. Cut marshmallows into squares with a pizza cutter or other shapes (using cookie cutters). Toss each in remaining starch/sugar mixture to coat. Transfer marshmallows to rack, shaking off excess mixture. One 9"x9" pan yields about 25 marshmallows.


Marshmallows can be layered between sheets of parchment and stored in an airtight container at room temperature for up to two weeks.

These ended up being a little larger than traditional marshmallows (and they are square, obviously) but I think that is kind of perfect for s'mores. I am excited to see how everything tastes. It they are better than the store bought variety then they are definitely worth it because it was not much effort at all.

Thursday, May 26, 2011

Bad boys, bad boys, whatcha gonna do...

I like to think that I am a pretty healthy and well adjusted woman when it comes to relationships. I am drawn towards quality individuals: men that are kind-hearted, compassionate, loyal, honest, and overall have Godly character. However, I have had a startling revelation recently that when it comes to fiction, I have a serious thing for bad boys!  In just about every love triangle in books or television, I am rooting for the dark, brooding arse-hole (notice that when you say arse rather than ass it doesn't quite seem like you are cursing - it's more ladylike) rather than the upstanding good guy that one SHOULD root for.
I noticed it yesterday when watching the season finale of Glee. I got a little emotional when Puck hugged Mr. Schuester. I realized that in spite of his slushy-throwing days, I really like Puck. He is much more interesting than poor Finn, who is well.... kind of boring. Yeah, Puck is kind of a jerk, but a lovable one.


Lost is another good example. Kate's dilema: Jack or Sawyer. There is no question, Sawyer was a serious jerk for the first few seasons but being stranded on an island was good for him and in spite of himself he turned out to be a self-sacrificing leader (with muscles that would make anyone swoon). And Jack... he was just kind of whiney and annoying after a while. I think Kate chose wrong.


And then we get to the Vampires. Elena seems pretty set on Stefan but I don't know. Damon, in spite of the fact that he is a blood-thirsty killer with no conscience or soul to speak of, seems like he could be a honorable man if the right woman loved him. I am pretty sure the writers of the Vampire Diaries won't see it my way, but I say ditch Stefan and give Damon a chance. I bet he would rise to the occasion.


True Blood's Sookie Stackouse has a similar dilema: the honorable Civil War Veteran, Bill Compton or the barbaric Viking, Eric Northman. I am "Team Eric" all the way. Mainly in book four when he gets amnesia and forgets that he is supposed to be a bad ass and we see a glimpse of the kinder, gentler, vampire that he is deep down.


So really, when I think about it, I like the bad boys but mainly because of the glimpses of good that we are teased with. Maybe it is the mystery of it all, being privy to the secret gentleness behind the hard exterior. I honestly don't know what is more disturbing: the fact that I am am swooning over such jerks, or the fact that half of these examples are blood-sucking vampires, or the fact that they are fictional characters that don't actually exist! All of it boils down to the fact that I think I might need some serious help! Any suggestions?

Oh, and you are very welcome for this attractive collection of photographs. Feel free to bookmark this page :)

Monday, May 23, 2011

Pretty Cakes (part 2)

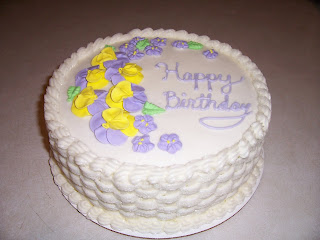
Round two of my cake decorating class wrapped up tonight. Over the last few weeks, I learned how to make flowers with royal icing I have to say, royal icing is a pain in the butt to make and use and I doubt I will ever use it again. I definitely prefer buttercream. The nice thing about royal icing is that it dries stiff so you can make flowers that stand up a bit and they won't flop over. Plus, once the flowers dry you can save them for months and they are still good to use. The down side is they aren't really very tasty, so they look good on a cake but you end up picking them off anyway. Here are a couple of pictures of my final cake:


You will notice the basket weaving on the sides of the cake. We learned how to do that tonight. I love it because it hides all flaws and looks pretty impressive but it is very easy. The writing was an afterthought which is why "Birthday" is kind of squished. You should always start with the writing so that the words are evenly spaced out. Lesson learned for next time. Oh well, it isn't anyone's birthday anyway, I am just taking this cake to my Tuesday night Community Group.

Unfortunately, Community Groups kind of disband over the summer so I am not sure what I am going to do with all the cakes I make in round three! Next month is fondant which is where you can get really creative. I am looking forward to learning how to work with it. Let me know if you want to help me eat cake, otherwise after taking a picture, it will probably end up in garbage. I mean, seriously... what is one person supposed to do with a whole cake?!?

Mango Avocado Salsa


I have been sitting on this recipe for a while and finally have an excuse to try it out. My Wednesday night Community Group is having a Mexican themed potluck and game night. The original recipe made a ton of salsa so my Tuesday night Community Group will get some too... as well as a few of my co-workers... and my roommate... and the neighbors...and...
It turned out pretty good. I have never made salsa before, it was super easy! I love the mango and avocado. It makes the salsa pretty and yummy! I cut the recipe in half for future use. Here it is! 

Mango Avocado Salsa

½ finely chopped mango
½ finely chopped avocado
2 finely chopped tomatoes
½ of a jalapeno pepper, seeded and minced
¼ cup finely chopped red onion
⅓ cup minced fresh cilantro
1½ cloves garlic, minced
½ tsp. salt
½ tsp. cumin
1 Tbs. fresh lime juice
1 Tbs. olive oil
Combine all ingredients together and let sit 2-3 days for all the flavors to meld together. Serve with tortilla chips.

Thursday, May 19, 2011

French Silk Deliciousness!

I made a French Silk Pie for Joni's birthday last night. I credit this recipe to Ryan. He requested it for his birthday last year and until that point I had never eaten French Silk Pie much less attempted to make it. My first try turned out okay but it wasn't amazing. It was my own fault, I took some liberties with the recipe and added a little almond extract in place of the vanilla. I did that because when I was reading recipe reviews online several people suggested that. I discovered that I don't really like the flavor of almond extract all that much, so I nixed that. I also didn't add the chocolate curls on top and, lets face it, chocolate curls make it look more elegant and a huge part of enjoying a dessert is about presentation. Those tiny chocolate curls make it taste better (if only in your head)! 
I made the pie again for Tyler's birthday and nailed it then by *gasp* following the recipe! Last night, I made it for Joni because she is gluten free and aside from the crust, the pie is gluten free, so I guess it would be classified as gluten light. If you want the pie to be "extra chocolatey" you can also make an oreo crust. I like it either way. Anyway, it was a hit. So here is the recipe:


French Silk Pie


Crust: (Marie Callender's frozen pie crust always comes out perfectly so I rarely bother making that part homemade but here it is in case you want to)

1¼ cups flour
¼ tsp. salt
½ cup butter, chilled and diced
¼ cup ice water
1 egg mixed with 3 Tbs. water

Filling:

1 cup butter, room temperature
1½ cup sugar
4 1 oz. squares unsweetened chocolate, melted
2 tsp. vanilla
4 eggs

Whipped Cream:
1 cup heavy whipping cream
⅛ cup powdered sugar
½ tsp. vanilla
Crust:
In a large bowl, combine flour and salt. Cut in butter until mixture resembles coarse crumbs. Stir in water, one tablespoon at a time, until mixture forms a ball. Wrap in plastic and refrigerate for 4 hours or overnight.
Sprinkle counter and rolling pin with flour. Roll dough into a large circle (about 14“ around) Place crust in a 9” pie pan. Press the dough evenly into the bottom and sides of the pie plate. Brush the edges with egg/water mixture.
Prick the pie crust all over with a fork; this helps prevent it from puffing up. Place a layer of tin foil on the crust and add some pie weight or dry beans to keep it down. Bake the crust in a preheated 425°F oven for 12-15 minutes. After 8-10 minutes, you can remove the weights so that the crust browns a little.

Filling:
Cream butter in a mixing bowl. Gradually beat in the sugar with an electric mixer until light colored and well blended. Stir in the melted chocolate, and vanilla extract. Add the eggs, one at a time, beating 5 minutes on medium speed after each addition. Spoon the chocolate filling into a cooled, baked pie shell.
Refrigerate at least 2 hours.

Whipped Cream:
In a large bowl, whip cream, powdered sugar, and vanilla until stiff peaks form. Top chilled pie with whipped cream and garnish chocolate curls.

*This is not the actual picture of the pie I made. My pictures just don't look as pretty as the ones I find on Google Image. I am such a cheater!*

Saturday, May 14, 2011

Let the beer brewing begin!

I mentioned a while back that I had beer brewing, viking neighbors. Well, my roommate has been hanging out with them and now his new hobby is brewing beer. Now, I am all about him having a hobby that doesn't include getting baked and playing video games, but this one does have some drawbacks.
For one, he is building a huge storage shed thingy in our back yard to house all of his beer brewing paraphernalia. I was hoping to eventually put a table and chairs out there for summer get-togethers. I guess it is my own fault for waiting too long to claim the space, now the back yard is filled with brewing stuff and pretty unusable for anything else. Bummer!

The bigger drawback is the beer itself. Have you ever smelled beer being brewed? It smells very strong and vinegary. This is happening in my kitchen right now:

It is filling my house with a hot, sickeningly sweet/sour smell. I am upstairs in my room with the window open and the fan blowing and I am still having a hard time breathing. My cinnamon wall plug-ins are no match for this! My house no longer smells like woman lives in it. It is becoming more and more "bachelor-paddy" every day.

In my bathroom there is now one of these:


Now, I have to admit, watching the bubbling yeast in the brew does make bathroom time a bit more entertaining, but seriously? This is NOT going to live in my bathroom. No way! I am hoping that when the giant shed in the back is done, the beer will move out there. If not, we will be having a discussion.

Sigh... the compromises one must make when sharing their living space with a random person they found on Craigslist. At least I can whine and complain about it to all of you. Okay, in unison, one...two... three... "Poor Tamara!" I am done now.

Muahaha!!!


In order to test your loyalty, I have been toying with your emotions by posting my blog and then yanking it away, posting it again, and yanking it away. I am using this subtle manipulation to make you understand that my blog is a hot commodity and if you happen to catch it, you are very lucky. What can you learn from this, dear friends? Do not take "The Blog" for granted. I can take it away at any time! For now, read on, my minions, read on...

P.S. Just kidding, Blogger has a glitch and it keep messing with the recent posts. It should be fixed soon. But it is nice to know that I actually have readers who notice when it goes missing. I feel all warm and fuzzy inside! :)

Thursday, May 12, 2011

Hobbit Soup

I have been a pretty delinquent blogger lately. I haven't really been in a writing mood lately plus it seems as if life is getting busier or something, my days just keep slipping away from me. I will post my latest food experiences though, posting a recipe takes no creative energy. It's my "blog cop-out".

Anyway, last week I was looking for a bread recipe to mimic Outback Steakhouse's "Bushman Bread". I found two very different versions and both of them got rave reviews. I decided I needed to make both in order to figure out the best one. Then I thought, "What goes good with homemade bread? Homemade soup!" I have a really yummy wild rice and mushroom soup recipe. Now, I know what you are thinking, "Mushrooms and wild rice? Kind of boring, nothing special." Don't be fooled. This soup is delicious! It is very rich and flavorful.

So, making two loaves of bread and a pot of soup seems a bit ridiculous for one person so I decided to feed my community group on Tuesday. When it came to the bread, there was a clear winner and a clear loser. The loser loaf got tossed because it was THAT unimpressive. The winner is a slightly sweet bread that goes great with honey/cinnamon butter. It paired perfectly with the soup which Ellie named, "Hobbit Soup". The mushrooms and wild rice give it an earthy feel and it kind of does seem like something Frodo would eat in the shire. This meal is perfect to have on a chilly fall day (or a toasty day in May when you just WISH is was a chilly fall day!) Here are the recipes:

Hobbit Soup


1 cup wild rice
1 Tbs. salt
1 oz. dried porcini mushrooms
1 Tbs. butter at room temperature
4 oz. pancetta or porsciutto, finely chopped
8 oz. button mushrooms, finely chopped
1 leek, halved, rinsed, and white and light green parts thinly sliced
2 Tbs. flour
½ cup dry white wine
3 14 oz. cans chicken broth
3 Tbs. minced Italian flat-leaf parsley mixed with 4 Tbs.butter
1 tsp. freshly ground black pepper
⅔ cup heavy whipping cream


Put wild rice, salt, and 8 cups cold water in a medium pot. Bring to a boil, lower heat to maintain a steady simmer, and cook until rice is tender, about 30 minutes. Drain and set aside.
Meanwhile, put porcini in a small bowl and pour in 1½ cups boiling water. Let sit until soft, about 15 minutes.
In a large pot, cook 1 Tbs. butter and pancetta/porsciutto over medium-high heat until the meat renders some of its fat and turns a lighter pink. Add button mushrooms and leek, Cook, stirring occasionally, until mushrooms give off their liquid, about 10 minutes.
Meanwhile, lift porcini from liquid with a slotted spoon (reserving liquid), chop finely, and add to pot.
Sprinkle vegetables and pancetta/porsciutto with flour and cook, stirring constantly, until flour starts to stick to the bottom of the pot (scrape it up as much as possible while stirring). Add wine, reserved liquid from soaking porcini (pouring slowly so as to leave any grit behind), and broth. Bring to a boil, then lower heat to maintain a steady simmer and cook 15 minutes.
Add reserved wild rice to vegetable mixture and cook 10 minutes. Stir in cream and parsley/butter mixture and cook until hot, about 1 minute. Serve!


Bushman Bread (the winning recipe)


2 pkg. (4½ tsp.) dry yeast
½ cup warm water
1 Tbs. sugar
1 cup warm water
½ cup dark molasses
1 Tbs. salt
2 Tbs. vegetable oil
2 cups rye flour
3 cups flour


Preheat your oven to 350°F.
Soften yeast in ½ cup warm water. Stir in the sugar and let stand 6 minutes or until it’s bubbly. In large mixing bowl combine the yeast/water combo above along with 1 cup warm water with molasses, salt, oil and rye flour. Mix ingredients until it makes a nice smooth batter.
Work in the flour until the dough is smooth and no longer sticky. It should be very pliable and elastic. Knead the dough for a few minutes and then let it rise in a greased bowl until it’s doubled. Punch the dough down and shape into 2 large round loaves. Place the loaves a few inches apart on a cookie sheet. Brush the top with melted butter and sprinkle rolled oats over the top.
Let bread rise in a warm place until doubled.
Bake at 350°F for about 25-30 minutes or until the crust makes hollow sound when tapped. Serve hot with butter. (even better with honey/cinnamon butter!)